

Hey everyone!
Automated newsletters beta is finally here!
In this email, we’ve included a download link, installation instructions, and an overview of all the new features.
Things to note:
- Share your feedback. We want to build powerful features for you. So your input is a critical part of the process. Please don’t hesitate to let me know about improvements, feature requests or any bugs. The more detailed and opinionated the better!
- Install on a staging site. As this is a beta, we also don’t recommend you install this onto your live site. Instead, set up a staging site and play around without fear of anything breaking.
- Finally, this is a really long email as Automated Newsletters is a big feature set. So grab a tea or coffee (I’m currently drinking a passionfruit black tea), sit back, and read through this at your own pace.
Without further ado, let’s jump straight in.
Here’s everything this update includes:
- How to set up (includes download link)
- Updated admin menu and feature locations
- Global styles (replacing the newsletter theme designer).
- Template styles (global styles, but at a template level).
- Updated Latest posts block
- Automated emails
How to set up
Download the ZIP file from the dropbox link below. Then install that onto your test site like a normal plugin. This should override your existing Newsletter Glue plugin and just start working.
Here’s a link to download automated newsletters:https://www.dropbox.com/s/ec2j9d2qo3l3l5j/newsletter-glue-pro%20beta%20automated%20newsletters.zip?dl=0
If something breaks and you want to go back:
You can revert to the latest version of Newsletter Glue. Download this ZIP file which contains v.2.1.9 and upload it onto your site.
https://www.dropbox.com/s/wc9ipaiyz9gxa0c/newsletter-glue-pro%20v.2.1.9.zip?dl=0
Updated admin menu and feature locations
This is a relatively small change, which is why it’s a good place to start.

We’ve simplified the admin menu. Rather than having Newsletters, we’ve replaced it with term Emails. Clicking on Emails brings you to the Campaigns list (which is the old Newsletters list). There is now a new tab called Automated emails.

Custom CSS has moved
We’ve also moved Custom CSS to the bottom of Global styles and template styles. (More on this in the next sections)
And we’ve retired the Only use custom CSS from the above box feature. This allowed users to completely strip all styling from their newsletter and only use the code they provided in the custom CSS box. To our knowledge, few to nobody was using this feature. If this was a critical feature for you, please let us know and we will work with you to come up with a suitable workaround.

Global styles
Access the brand new global styles by heading to Templates & Styles then navigating to the Global styles tab.

Here you’ll be able to customise your newsletters exactly the way you were doing it with the newsletter theme designer, except that we’re now using all Gutenberg components and React. This not only makes everything faster, it also reduces the plugin size.
Key features

Our quick styles feature allows you to quickly select a newsletter style that you like. Use it exactly like that, or customise it from there.
Important (potentially template breaking) notes
You might notice that three formatting options have now been removed from global styles. Namely, add featured image to the top of each newsletter, make blog link clickable, add logo to the newsletter.

When we first created these features, Gutenberg blocks such as Feature image did not exist. However, in the years since, many of these important blocks have since been built. And we’ve been slowly optimising them for email one by one.
These options needed to be retired for 2 reasons:
- The customisation options we were able to provide here were very limited.
- It caused a weird combo experience where users would set some options here in the newsletter theme designer, then go into the template builder to build the rest of the template.
In this new version, global styles is now purely about styles. And the previous logo, featured image options can now be recreated with Gutenberg blocks!
If anything breaks for you or if there’s something missing here, please let us know right away and we’ll fix it.
Template styles
You can also change styles at a template level.
To access this, create a new template, then click Template style in the right hand area of the top menu bar.

This feature allows you to create templates with completely different styles. Previously, if you had set green headings in the newsletter theme designer, all your newsletters and templates would have green headings unless you manually changed them or added custom CSS.
Now, you can easily set background, link, heading colours and more for each template.
Importantly, you can now add custom CSS at a template level too! This brings an additional level of customisation to each newsletter.
Latest Posts block
This block has already been available for a month now, but we’ve made some slight adjustments:
Updated time frame selection
We’ve updated the time frame selection to include more typical analytics-style filters. So you now have additional options: last 24 hours; and last 7, 14, 30, 60 days.
If you have a clear use case for the old options (today, this week, this past 2 weeks, this month), please let us know. We’ve kept the old options for now, but are planning on getting rid of them.

Delete posts
We’ve also added the option to delete posts because you don’t necessarily want every available post to be added to your newsletter.
For example, you publish 10 posts a month, but only want the top 5 posts to show up in your monthly newsletter. You can simply hide the 5 that you don’t want.
To use this feature, simply hover over the post you don’t want. You’ll see an option to Hide this post in the top right hand corner. Click the button, and the post will be greyed out. It won’t show up in your newsletter anymore.
If you regret this move, and want to show it again, simply click on the same button again, and the post will show up again.

Existing Latest Posts block features (in case you missed it)
The Latest Posts block allows you to dynamically filter your latest posts by author, post types, category, and more.
Once you’ve chosen your filters, click on Update block to see your changes reflected.
You can select between multiple posts and single posts which means you can create an email digest, or simply send your latest post.
This block forms the backbone of our automated newsletters. You’ll add this block to every automated newsletter, and each week (or whatever schedule you set), it’ll auto-populate the latest posts, and automatically send your newsletter out.
We’re really proud that this block was built fully in React and is fast.
It has all the same options as our post embed block, and more. We’ve learnt that many of you were looking for 2 column display options in our post embed block. So we added a double column option into this new block. And will add it into our post embed block sometime in the future.

Automated emails
And this finally brings us to automated emails! All the features I just covered above took us months longer to implement than automated emails themselves! As you can imagine, a lot of work went into architecting everything step by step.
Here’s how you can access automated emails…
We’ve updated the admin settings. To access automated emails, click on Emails then the Automated emails tab.

Create a new automation
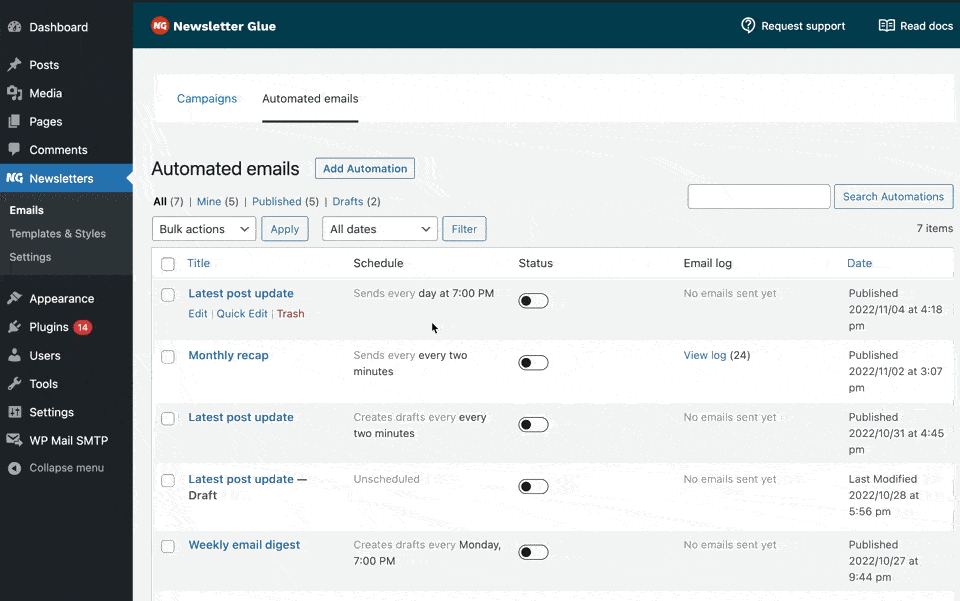
To create a new automation, click on the Add automation button. You’ll be given the option to select from a latest post update, monthly recap, or weekly email digest. These are pre-built templates to help you get started.

From there, you’ll head into the automation template builder. Build and customise your automation template however you like. We’ve pre-added our Latest Posts block for you as a guide and inspiration.
Selecting your email frequency and automation type
Once you’re done building your automation, it’s time to set up your automation schedule.

In the familiar Send as newsletter metabox section, we’ve added email frequency and automation options.
You can set your email frequency to daily, weekly, every two weeks, monthly, and even two minutes for testing.
You can also select whether you want us to send the email automatically or create a campaign draft.
When to…
- Send automatically: Useful if you want to set your emails up once, and then never worry about them again.
- Create campaign draft: Useful if you want 90% of your newsletter to be magically built for you, so that you can simply go in, write an intro and send a test email, before publishing.
And when you’re ready to publish, just check the box and publish it.
Tiny note about WP-cron
Our automated newsletters features makes you of WP-cron. For the WP developers out there, you know what this means. For the rest of us non-developers, if you’re encountering issues with your automation not working or being delayed, it is likely to be a cron issue. The automation can only fire when your site has visitors. So if you didn’t have anyone on your site at the time, it will simply fire the next time someone visits.
And that’s it. I hope you enjoy all these new features! We’ve worked long and hard on them. If you encounter any problems, find any bugs, or have feature requests, please don’t hesitate to reply to this email!
Best,
Lesley